Sunday, October 11, 2015

I need to finish these! Q4 2015 Finish-Along

2015 FAL at On the Windy Side


Haven't posted in FOREVER, but I really, really need to finish some of my WIPs. Some of my two-year-old WIPs are not included here.

I am hoping the Finish-Along will push me along. "Put a fire under my butt" is what I thought, then I decided that was a little rude, but I guess I will never quite be a PC quilter.

So, I have many more projects waiting to be done than this, but these are the ones I hope to finish in Q4.

A tote based on Crafty Gemini's tutorial for Missouri Star Quilt Company.  It has been sitting around all summer. Time to finish it up. Fabric is from Kate Spain's Horizon line.

A rainbow quilt, which I started because I had a jelly roll and wanted a quick sew. Then I didn't like it, so have chopped it up and am adding white. Thanks to my Music City Modern Quilt Guild members for help on how to fix it. Now I just need to finish it.

The Riley Blake Quiltcon Challenge. I couldn't just go black and white, so want to add color somehow and maybe curves. I've never done true curves, so this will be a challenge. It will also be a mini-quilt.

Top and back are pieced. I just need to make the quilt sandwich and get it quilted. It won't take long if I would just get started!

I bought these "cheater" placemats to quilt for a Christmas present. Totally not my colors, but I still think they are pretty, but if I don't start, they won't be done in time for Christmas.

A Harry Potter quilt for a little girl who LOVES Harry Potter books. This is fun, but time consuming. However, it MUST be done before Christmas, so I have to get started. This may be first on my list because I want to take my time with it. I have made a mini-quilt from the same pattern and it was fun to watch it come together. Just in case she outgrows Harry Potter, thought I don't know how anyone could, the back will be Tula Pink's tigers from her new Eden line.

My goals! Hope I get there!!

Friday, February 27, 2015

We Bee Learning

This is my month for the We Bee Learning quilting bee, and I am excited to get started. I hope you all love this block as much as I do. This quilt will be for me because I have yet to make a quilt for myself. I hope you don't mind contributing to my first ever "kept" quilt.

I chose Lee Heinrich's (Freshly PiecedRibbon Star Block because she has a great tutorial, and the star is so lovely. Her blog is a great source of inspiration for me. The block is a 12.5" block, so the perfect size for our bee.

(photo credit: Lee Heinrich of Freshly Pieced)

(photo credit: Lee Heinrich of Freshly Pieced)

In terms of fabric, I prefer moderns. You can use florals, geometrics, solids, or anything in your stash. I am not a huge fan of Civil War reproduction fabrics or brown, but I like tans and creams. 

In terms of color, I am desperately in need of spring colors to get through the rest of this winter. You can see below that pinks, fuschias, blues, yellows, greens, and white are the base from the inspiration photo. However,  feel free to add in more spring colors—oranges, lavenders, reds, yellow-greens—The backgrounds can be in colors, whites, or light grays. My husband loves scrappy quilts, so a bright explosion of spring will be perfect.

I pulled in an image from Google Images and used PlayCraftsPalette Builder to come up with a color combination. The palette builder only demonstrates solids, but I love both patterns and solids, so any mix you think works will be good for me. 

I have pulled some fabrics from my stash that I will choose from to make my two blocks. First, however, I have to get Katie's blocks done. I will post my two as soon as possible in the Flickr group. Still need some stamina back after my bout of pneumonia. This winter has not been my friend.

Note: The photos are not great because it is evening and dark. I will try to retake the photos in better light tomorrow and exchange them here.

Blues and aquas - note they are not all tone on tone

Whites (though they look gray in this photo) and grays for possible backgrounds

Oranges and spring greens with a little teal

Pinks, fushias, and lavenders

My yellows are sadly lacking. I am going to have to add some more sunshine to my fabric!

Tuesday, December 30, 2014

A Finish--Shocking but True!

Well, finally I am finished with my heart quilt. I refuse to go back in my blog and see when I started it. It underwent many changes as I worked on it, going from a rail fence to a heart, then a heart with a red center. I also did my first long-arming on this quilt. Had to rip some out because I had railroad tracks on the back, then do my own FMQ on my domestic machine. I think it looks fine after washing though. So, I guess you can say this is my first true, not practice, FMQ.

Today was the first sunny day in awhile, but a cold, cold wind was blowing as we took these photos.


Tallulah came over to investigate...actually to see Yud who is just to the left of this photo, but I couldn't resist including this photo even though the wind was really not helping me with my photo. If you ever meet my husband, don't tell him you saw his bald spot. He is trying to pretend it doesn't exist.


In this photo of the back, you can really see how the wind was blowing and more of the bald spot. :-)


Monday, December 29, 2014

2015 Finish Along

Adrianne at On the Windy Side is hosting the 2015 Finish Along and I am excited! You link your WIPs to the quarterly linky party and then link back to your finished projects at the end of the quarter. I am hoping this forces me to finish some really old WIPs, including a Christmas wall hanging I did in one of the first classes I took after I got my sewing machine.

All the details are available on Adrianne's blog linked above. Prizes are along involved, so link up those WIPs.

Below are the three projects I hope plan to finish in the first quarter. Two baby quilts. There is actually a third I need to do, but I don't have fabrics pulled yet.


I don't have a pattern here, but I am doing half-square triangles in a diamond pattern. Hope that is enough information for the Finish Along.


The upside down Christmas quilt. OMG...the mistakes I see on this quilt. I have actually enjoyed getting it out again because I can actually see how much I have learned about quilting in two years. And how much my style has changed.


I may have more projects to add before January 7th because several are "in the works," but they are not complete enough to include here yet. One is pulled with a pattern, but I am not feeling that quilt today, so don't really think I would complete it during the first quarter, so I am leaving it off.

Wednesday, December 24, 2014

Merry Christmas!

Merry Christmas to all those who celebrate Christmas! From my family to yours....

Debby and Dolph
A short trip to Yellowstone before Christmas


Tallulah, Yud, Jaspyrr, Mandu, Willow, and Honeynut

Willow (bottom left) is my quilting buddy. She never leaves my side when I am quilting, often sleeping off to the side gently snoring away. Shhh...don't tell the others...but she is my BCF (best cat forever).


Monday, December 22, 2014

Mondrian Riff Mini-Quilt Tutorial

I am not quite sure this is a tutorial. I think it is more of a "this is how I did it" explanation. If you have questions, just let me know.

This is an easy quilt, so beginners who know how to rotary cut and sew 1/4" seams will have no problems with this quilt, especially if you like to stitch in the ditch. If you do not know how to stitch in the ditch, check out this video from Quilty with Mary Fons. Of course, depending upon your color selection and patience with burying threads, you might choose to do another type of stitching when you are ready to quilt your pieced top.

I used a design-as-you go approach for this design, starting with color selection - bright, bold solid colors. I went with red, yellow, orange, blue, and green to begin.


Use your design wall or a dining room table and start by laying out two1.5 inch black strips. Size doesn't matter at this stage. Choose something bigger than your expected finished quilt top. I chose strips that were  1.5 x. 27.5 and 1.5 x 43.

I like asymmetrical, so started with the off-center cross below. My design wall is just a cheap plastic table cloth turned backwards and tacked to my sewing/office room wall so that the flannel backing is on top.


Now just start cutting your fabrics. I tend to choose 5", 4", and 2.5" strips because I can easily use the leftovers in other projects. When I get to a random spot that needs color, I measure the area I need filled and cut a strip to match.


 I also pull strips off the design wall and use them to measure for cutting too. This is where design-as-you-go really comes into its own. By putting the blue rectangle on top of the green I wanted to add, it was easy to see know where to cut the green.


Once I add a few pieces, I back up, take a photo and decide if I like the pattern or if I need to change something.

For me, this is too square and does not have any white. I may need another black strip somewhere too. So off to cut some white strips/blocks and we will see what we have. I think I am going to build this "sideways" and then turn it later. I am going to add more rows/strips to the left of the long vertical black strip.


Still a little square, but more white. I also do not like the white strips that are parallel to each other in the same locations.


This is the rectangle I am looking for, so I am pleased with that. I have one more piece to add in (see the design wall peaking through under the lavender). I think I want another red piece or even a random different color. If I go red, I am probably going to have to move a few pieces around to make that work.

Notice that I do not care about the uneven ends. They will be easy to even up with I am finished sewing the sections - the areas between the black strips - together.

Piecing is easy. Just section off the areas around the black stripes and use a 1/4" seam. Once you have a set either horizontally or vertically completed, you can begin to add in the black stripes. On this mini-quilt, I added the strips horizontally first, then cut so that I could add the longer vertical strip.


I just used gray on the back (Kona Pewter) and used straight line quilting to quilt. Quilting is still my weakest area. My goal for 2015 is to improve my quilting and become less afraid of FMQ.


Because I was in a rush to finish my Secret Santa gift (and this was it), I have no photos of the back of the quilt. I do have one with the binding. I used a 2.5" black double fold binding and machine stitched it. For machine stitching, stitch the binding to the back first, then fold over and iron and stitch close to the edge on the front. 

The only finished photo I have is from our guild Secret Santa swap and is not great, but at least you can see it with binding and after washing/drying. Using color catchers in the wash meant I had no problems with the bright colors bleeding at all!


If you look back at the design I decided would work, you will see that this is different. I also think I have the colors of the Irish/Ivory Coast flags in the top right corner. 

Sunday, December 7, 2014

Mondrian Riff Mini-Quilt/Wall Hanging


So, if you know Piet Mondrian's work (above) and you quilt, you have likely had the same idea - ohhh, I could make a quilt like that. This weekend, after thinking about it for awhile, I decided to give it a try. Below is my first attempt. 


I chose colors and then created the design on my design wall (a reversed plastic table cloth). I like it a lot, but learned one VERY important lesson. Do NOT, I repeat do NOT steam press a light-colored square without first removing all the black thread remnants. I do not pre-wash my fabrics and the black just melded with the yellow in one tiny, irritating spot. ARRGGHHH!!

I was making this as a Christmas swap gift, so back to the drawing board. The tiny black dot that would not bother me if I were making this for myself is just too irksome as a swap gift.

I am making a tutorial for my next Mondrian. Stay tuned.

Friday, December 5, 2014

Porter Flea Market - Nashville

I am going to my first pop-up Modern Handmade Market tomorrow - the Porter Flea Market. It should be really, really good. It is a juried show with multiple vendors, including some sewists. Craft South, Anna Maria Horner's company will be there. Oh Just Dandy looks really cool if you have babies who need Christmas presents. She has baby bibs and burp cloths made from Cotton & Steel fabrics!

Some of the items will be totally affordable - $8 for a Cotton & Steel baby bib. Other things will be beyond what I am willing to pay - e.g., small absolutely adorable earrings for $150. Everyone should be paid for their work, so I actually think $8 is too low and $150 acceptable for some, but not for me. Both vendors likely know their markets, so I guess the prices are fair for them. How do you decide on a price?

I have had two people ask me to make quilts for them. Both have said they will pay for the quilts. I declined both offers because how do you charge a fair price for your labor, the material, and your creativity? I agree with Sam Hunter and her We are $ew Worth It post. However, I do not feel that I am up to Sam Hunter's level of creativity and skill. So, what would I charge?

The local guild members here say 7 cents a square inch is the going rate - that is $400 for a twin-sized quilt. Whoa! Hmmmm. I do not think my quilting is up to a $400 level. I may get there, but for now I am just going to give my quilts away and enjoy the process.

Sunday, November 30, 2014

Long Arm Quilting Experience

Well, a couple of weeks ago, I went back and used the long arm quilting machine (HQ Avante) at the LQS that rents them out. It was quite a different experience from having an instructor beside me all the time. From 10 paces on a fast horse, the quilt looks fine (if you don't look too hard at the bottom left corner).


Below are my mistakes. First the close-ups that show the funky quilting pattern and the wrinkles.


Now for the specifics: 
  1. Loaded machine backwards, despite instructions I wrote and photos I took during the lesson.
  2. Had a terrible time with the basting stitch designed to hold top of quilt in place, so I have some very wrinkled quilting near that basting stitch. I am going to assume that washing will make the quilt all wrinkly.
  3. Had a mess on the back of the quilt from a bobbin issue that I didn't see until I got the quilt off the machine. Thank the gods it was only a small part of the quilting. I had to rip that part out. Ripping out thread after you have quilted is TIME-CONSUMING!
  4. Shop did not have the color thread I needed, so used a color I am not that enthused about, but I am living with it.
  5. My quilting pattern is funky to say the least, but functional (see above photo). I was trying for waves and ended up with sort of waves and circles.
  6. Quilting when you are renting a machine is tiring. No time outs for tea or to think about what to do. Just quilt, quilt, quilt. I was dead tired at the end of the session - 4 hours to do a lap-sized quilt. It took so long because I had to wait to get help because I kept making mistakes. LOL.
  7. I have decided to quilt the red section in red, so I am in the process ripping out thread because the contrasting color just looks tacky. While quilting I thought I needed to do red, but then thought, but I will never finish it, so went back and quilted it in same color as the rest. Big mistake! You can really see the funky quilting pattern here. Looks horrific. The other is somewhat hidden because of the thread color.
Will I rent the machine again?
Probably. I would prefer to have my own midsize quilter, like an HQ 16. However, that is unlikely to happen anytime soon because of cost and space, so I am going to have to get better at free motion quilting without a stitch regulator or get creative with straight line stitching.

Lessons Learned
  1. Use thread color that matches. 
  2. Don't try new patterns on a quilt you are giving to someone :-).
  3. Take matching thread with you.
  4. Take a quilt to practice on that you will keep and abuse.


Sunday, November 23, 2014

Baby Vests

Our quilting guild (Music City Modern Quilt Guild) makes vests for the Neonatal Intensive Care Unit (NICU) at Vanderbilt Children's Hospital twice a year. This year we brought some home to work on after our sewathon a week ago Saturday.

On this cold, rainy Sunday I decided to work on some of the vests, despite the looming mass of presents to make/complete for Christmas. The vests are just so sweet that it is a pleasure to work on them. A friend at a baby in a NICU unit, and she would have enjoyed seeing her little one in a colorful vest.


It takes as long to turn the vests inside out as it does to sew them - the little shoulders are so tiny.

Monday, November 17, 2014

Silly Cat!

Willow update: She will sit on flannel, but not quilting cotton. Comfort over beauty. A cat after my own heart!


Silly Willow refused, absolutely refused, to sit on her new window seat cover today. Now, it could be because it is wicked cold outside for Tennessee and the air from the window is cold. It could also be that she is just picky. I vote for the latter.

So, I am going to make a her new cover in flannel with wool batting. This is one spoiled cat.

Willow

First, however, Tallulah gets her cat pad with wool batting. She sleeps in the basement because she attacks Jaspyrr, and it is a little chilly down there. No worries though, she has her own little house that is also covered with blankets. The cats have us trained!

Tallulah

Sunday, November 16, 2014

Thermal Cat Pads for this Cold, Cold Winter

It is too cold for November in Tennessee. I am freezing; my cats are freezing. So...I decided I could do something for the cats. Thinking about how to make something that would keep them warm and was not electric, I remembered the mylar rescue blankets I had seen used in the Alps while I was living in Switzerland--light weight and heat reflecting. Suddenly a light bulb went off. I have hoarded  collected various quilting supplies as I was figuring out what I wanted to do with quilting. At one point, in a fit of insanity during a Joann's sale about a year ago, I bought way too much Insul-Bright. I thought I was going to make oven mitts. That never happened. Insul-Bright is also heat reflecting and, best of all, quiltable! Yes! 

So today, when I realized that I had to leave the ugly cat window seat as I was rearranging my quilting space from an office with quilting to quilting room with a laptop, I though AH HA - now is the time to test the thermal cat pad.  

Below is the UGLY and DIRTY cat window seat that Willow loves. I swear to you I vacuum it, but the cover, due to installer (me) error, is not removable. 


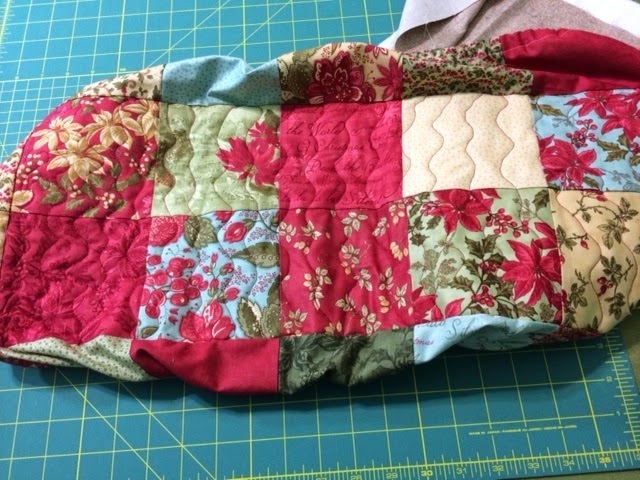
To make the thermal cover, I pieced together some Christmas charms I won at my quilt guild meeting  yesterday. Added the batting and just quilted the middle part--two rows of charms--(with fabric that is not my favorite as the backing with Insul-Bright as the batting). Found a baby crib tutorial on YouTube, cut 2 1/2 inch corner pieces out of the sides to made it rounded--watch the tutorial--it will make sense then, sewed a channel, added elastic and VOILA!--non-electric thermal cat pad.


I used it to practice free motion quilting. The cats won't care. Here is the back - the Insul-Bright is under the quilted part.


The front before putting over the old dirty cat bed. Yes, I know the dirt is just hidden, but it looks so much nicer.


In the interests of full disclosure, Willow refuses to sit on the thermal cat pad. She just doesn't know how warm it will be. She is upset by the entire furniture-moving-around day, so I will see what tomorrow brings.